
Tutorial: Add a Facebook Comment Section to Blogger in 2 Easy Steps
Today, I’ll be sharing a tutorial on how to add a Facebook comment section to your Blogger site.
Why should you add a Facebook comment plugin? Comment plugins allow users to engage with your content using their Facebook accounts. This makes it easy for them to share their comments with friends, increasing your blog’s reach. Additionally, Facebook comments come with built-in moderation tools and social relevance ranking.
I decided to write this after spending two days searching for a working solution. Many tutorials out there were either outdated or simply “fake”—they’d explain how to do it but didn’t even use the plugin on their own sites! I also tried Disqus, but encountered issues because I use a custom template. This Facebook method is the most reliable one I’ve found.
 |
|---|
| Tutorial: Adding Facebook Comments to Blogger |
Why use Facebook?
Almost every visitor has a Facebook account, whereas they might not have a Disqus or Blogger profile. Making it easy for visitors to leave feedback, suggestions, or critiques helps Google recognize your content as valuable. This is a great way to improve your on-page SEO.
Step 1: Generate the Plugin Code
Visit the Facebook Developers page: https://developers.facebook.com/docs/plugins/
- Select Comments from the list of plugins.
- In the URL to comment on field, enter your Facebook Fan Page URL. (If you don’t have one, I recommend creating one for your blog).
- Set the Width to your preference (I recommend making it responsive).
- Set the Number of Posts (I usually use 10).
- Click Get Code.
 |
|---|
 |
Step 2: Install the Code in Blogger
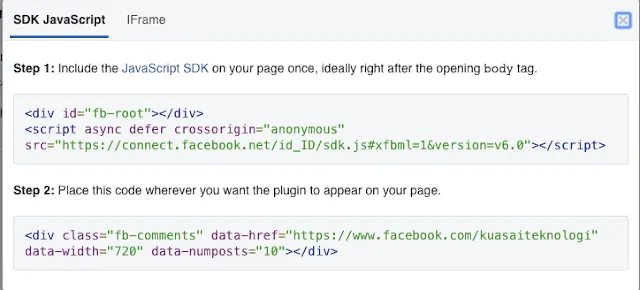
Facebook will give you two snippets of code.
 |
|---|
Part 1: SDK Installation
Go to your Blogger dashboard, select Theme > Edit HTML. Find the </head> tag and paste the first snippet of code directly below it.
 |
|---|
Part 2: Plugin Placement
Now, search for the following code in your template:
<div class='post-footer-line post-footer-line-3'>
Paste the second snippet of code directly below it. If your template has multiple instances of this line, paste it under each one to ensure it appears on all pages.
 |
|---|
 |
Finally, click Save Theme at the top of the editor.
That’s it! You should now have a working Facebook comment section on your blog. If you encounter any issues, feel free to ask in the comments below. Good luck!